How to Draw a Rose Tattoo: A Comprehensive Guide for Aspiring Artists
Rose tattoos are a timeless and popular choice for body art, symbolizing love, beauty, and passion. If you’re an aspiring artist looking to expand your repertoire or simply want to learn how to draw a rose tattoo, this comprehensive guide will walk you through the process step-by-step. We’ll cover everything from basic anatomy to shading techniques, ensuring you can create stunning rose tattoo designs.
Understanding Rose Anatomy for Tattoo Design
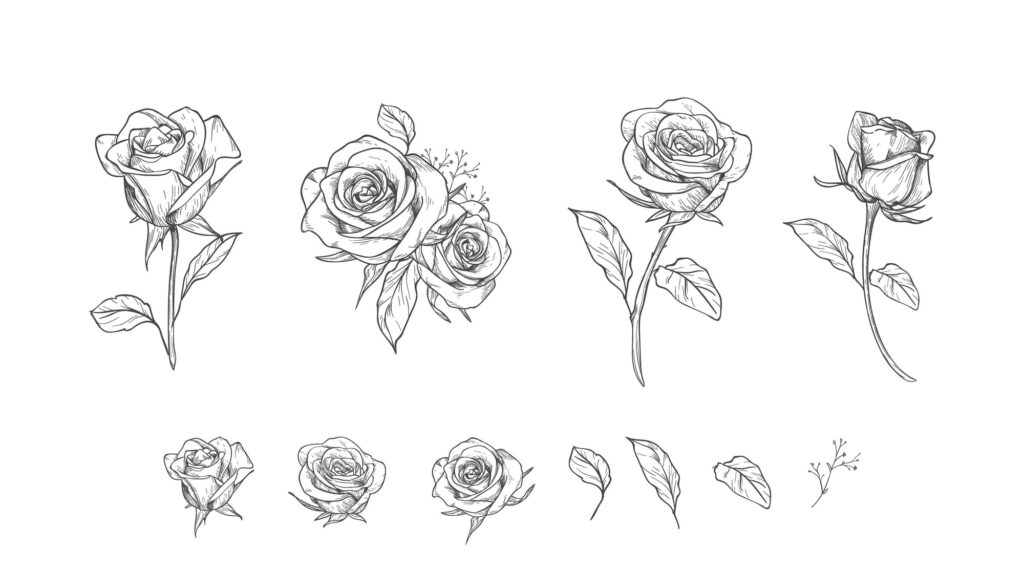
Before you start sketching, it’s crucial to understand the anatomy of a rose. A rose isn’t just a circular shape; it’s a complex arrangement of petals, sepals, and a stem. Pay close attention to the following elements:
- Petals: These are the most prominent feature of a rose. They vary in shape and size, with the inner petals tightly curled and the outer petals more open and relaxed.
- Sepals: These are the small, green leaf-like structures at the base of the rose. They protect the bud before it blooms.
- Stem: The stem supports the rose and connects it to the plant. It often features thorns, which can be incorporated into your tattoo design.
Understanding these components will help you create a more realistic and dynamic rose tattoo design. Knowing how to draw a rose tattoo means knowing its anatomy.
Gathering Your Supplies
To begin, you’ll need the following supplies:
- Pencils: A range of pencils (e.g., 2H, HB, 2B, 4B) will allow you to create varying shades and textures.
- Eraser: A kneaded eraser is ideal for lifting graphite without damaging the paper.
- Paper: Choose a smooth, high-quality paper that can withstand erasing and shading.
- Reference Images: Gather several reference images of roses from different angles. This will help you understand the flower’s structure and details.
- Optional: Tracing paper, ruler, compass
Step-by-Step Guide: How to Draw a Rose Tattoo
Step 1: Sketching the Basic Shape
Start by sketching a light circle to represent the overall shape of the rose head. This will serve as a guide for your petal placement. Within the circle, lightly sketch a smaller, tighter spiral in the center. This spiral will form the core of the rose. This is a foundational step in learning how to draw a rose tattoo.
Step 2: Adding the Inner Petals
Begin adding the inner petals around the central spiral. These petals should be tightly curled and overlapping. Use curved lines to create the petal shapes, varying their size and direction to add depth and dimension. Remember, roses are organic, so avoid making the petals too symmetrical. The more you practice how to draw a rose tattoo, the more natural your petal placement will become.
Step 3: Developing the Outer Petals
As you move outwards, the petals become larger and more open. These petals should be more relaxed and flowing, with gentle curves and folds. Don’t be afraid to experiment with different petal shapes to create a unique rose design. Consider adding small tears or imperfections to the petals to enhance realism. Think about how the light will fall on the rose as you draw these outer petals, a crucial consideration when learning how to draw a rose tattoo.
Step 4: Incorporating the Sepals
Add the sepals at the base of the rose. These are typically five small, green leaf-like structures that curve upwards towards the petals. They should be slightly pointed and overlapping. The sepals add a nice contrast to the soft petals of the rose and are an important element in learning how to draw a rose tattoo effectively.
Step 5: Drawing the Stem and Thorns
Draw the stem extending downwards from the base of the rose. The stem should be slightly curved and taper towards the bottom. Add thorns along the stem, varying their size and placement. Thorns add a touch of edginess to the rose design and are often incorporated into tattoo art. Paying attention to these details is what separates a beginner from someone who truly knows how to draw a rose tattoo.
Step 6: Refining the Line Work
Once you’re happy with the basic shapes, go over your sketch with a darker pencil to refine the line work. Emphasize the outlines of the petals, sepals, and stem, adding more detail and definition. Erase any unnecessary guidelines. Clean, crisp lines are essential for a professional-looking tattoo design. Mastering line work is a key component of mastering how to draw a rose tattoo.
Step 7: Adding Shading and Highlights
Shading is what brings your rose drawing to life. Identify your light source and use your pencil to create shadows and highlights. Darken the areas that are furthest from the light source and leave the areas that are closest to the light source lighter. Use a blending stump or your finger to smooth out the shading and create a more gradual transition. Varying the pressure on your pencil will create different levels of darkness, adding depth and dimension to your drawing. Understanding how light interacts with the rose is vital when learning how to draw a rose tattoo.
Step 8: Adding Details and Texture
Add final details to your rose drawing, such as veins on the petals, textures on the stem, and subtle variations in shading. These small details can make a big difference in the overall realism and quality of your design. Consider adding water droplets or subtle imperfections to further enhance the realism. The more detail you add, the more professional your how to draw a rose tattoo design will look.
Different Styles of Rose Tattoos
Rose tattoos come in a variety of styles, each with its own unique aesthetic. Here are a few popular styles to consider:
- Traditional: Bold outlines, vibrant colors, and classic imagery.
- Neo-Traditional: Similar to traditional, but with more intricate details and a wider range of colors.
- Realism: Highly detailed and realistic renderings of roses, often incorporating shading and highlights to create a three-dimensional effect.
- Watercolor: Soft, flowing colors that mimic the look of watercolor paintings.
- Black and Grey: Uses only black and grey ink to create a monochromatic rose design.
Experimenting with different styles can help you develop your own unique approach to drawing rose tattoos. Understanding these styles is essential for anyone serious about how to draw a rose tattoo for clients or personal projects.
Tips for Creating Unique Rose Tattoo Designs
- Incorporate other elements: Combine your rose with other symbols, such as skulls, daggers, or banners, to create a more complex and meaningful design.
- Experiment with color: Don’t be afraid to use bold and unexpected colors to make your rose tattoo stand out.
- Play with placement: Consider the placement of the tattoo on the body. A rose tattoo can look stunning on the arm, back, or leg.
- Study different rose varieties: There are many different types of roses, each with its own unique shape and characteristics. Studying different varieties can inspire you to create more diverse and interesting designs.
Common Mistakes to Avoid When Drawing Rose Tattoos
- Symmetry: Roses are organic and asymmetrical. Avoid making your petals too uniform or symmetrical.
- Proportion: Pay attention to the proportions of the rose. The petals should be the right size relative to the overall shape of the flower.
- Lack of detail: Don’t skimp on the details. Adding small details, such as veins on the petals, can make a big difference in the overall quality of your design.
- Poor shading: Shading is crucial for creating depth and dimension. Avoid flat, lifeless shading.
Practice and Patience
Learning how to draw a rose tattoo takes time and practice. Don’t get discouraged if your first attempts aren’t perfect. Keep practicing, experimenting, and refining your skills. The more you practice, the better you’ll become at creating beautiful and unique rose tattoo designs. Consider taking online courses or workshops to further develop your skills. [See also: Basic Tattoo Techniques]
Conclusion
Drawing a rose tattoo is a rewarding skill that can open up a world of creative possibilities. By understanding rose anatomy, mastering basic drawing techniques, and experimenting with different styles, you can create stunning rose tattoo designs that capture the beauty and symbolism of this iconic flower. Remember to practice regularly and be patient with yourself as you develop your skills. With dedication and perseverance, you’ll be able to create rose tattoos that are both beautiful and meaningful. Now that you know how to draw a rose tattoo, go forth and create!
